Admin access to your PBX (or a reseller) is required to configure Shared Inboxes. To start using Shared Inbox, customers must first ensure their organization has Company Numbers not currently assigned for messaging.
To enable, disable, or make changes to a Shared Inbox:
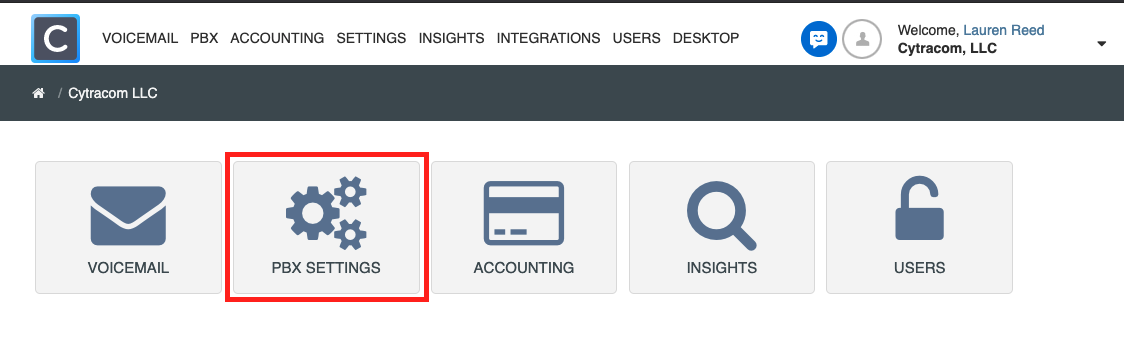
- Login to secure.cytracom.net
- Select PBX Settings
Company Numbers are numbers that are only routed for voice and not assigned to a specific user. Assigned numbers are all numbers that have been assigned for messaging to a user or that are assigned to a specific user for voice. Assigned numbers can not be “assigned” to multiple people
Company numbers become assigned numbers when the number is assigned to a user for voice/messaging.
As messages can only be configured to go to one place, Shared Inboxes can not be configured on an assigned user and an assigned user can not have Shared Inboxes enabled.
Configure Shared Inboxes
- Select the Company number you’d like to configure a Shared Inbox on
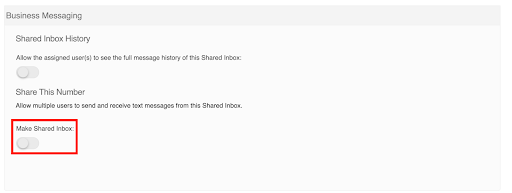
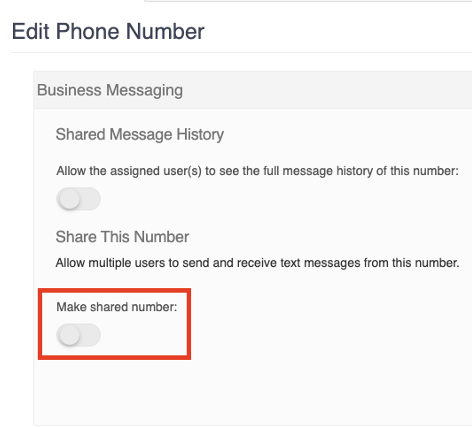
Note: Selecting either the phone number or the edit button will open the Edit Phone Number page - Select Mark Shared Inbox under Share This Inbox
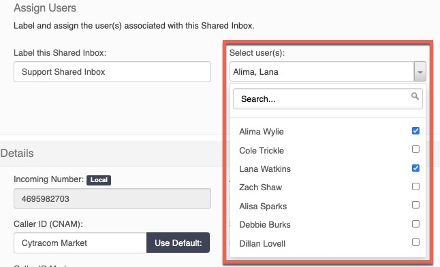
- Label the inbox with the name of the Shared Inbox

- Select users that you would like to assign to the Shared Inbox by checking the box of the user you’d like to add from the list, or find a specific user by searching for the user’s name and selecting it.

Note: There is no limit to the number of users you can add to a shared inbox. - Scroll to the bottom of the page and select Submit

- Once configured as a Shared Inbox, the number will display as an Assigned number. To view the number or update the configuration, select the Assigned tab to view or select the number from the list. The number will now be Assigned To “Share Inbox [Inbox Label]”

Configure Shared Inbox History
- From the Edit Phone Number page of a shared Inbox, enable Shared Inbox History
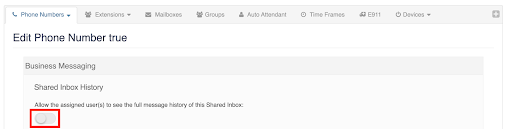
- Scroll to the bottom of the page and select, Submit
- After submitting, the Phone Numbers tab of the PBX Customer will display Company numbers. To view the Shared Inbox just configured, select Assigned and scroll to view the number ‘Assigned To’ “Shared Inbox [Inbox Label]” Ex: “Shared Inbox [Product]”
Add a User to a Shared Inbox
Users can be added to a Shared Inbox at any time by an Administrator or reseller in the PBX. There is no limit to the number of users that can be added to a Shared Inbox. If a user is added to the Shared Inbox and Shared Inbox History is not enabled on the Phone number, the user will see an empty message pane for any historic conversation associated with the Shared Inbox. If the user is added to the Shared Inbox and Shared Inbox History is enabled on the Phone number, the user will have historical access to all conversations associated with the Shared Inbox.
To add a user to a Shared Inbox:
- Select the shared Inbox you’d like to modify.
- Select the user Dropdown.
- Scroll to the user or search for the user you would like to add
- Select the checkbox of the user you would like to add
Note: You can add multiple users at once by selecting the check box of every user you would like to add. - Scroll to the bottom of the screen and select Submit
Removing a User from a Shared Inbox
Individual or multiple users can be removed from a Shared Inbox. When a user is removed from a Shared Inbox, they will no longer be able to access any of the conversations associated with the Shared Inbox. If the user is later added back to the Shared Inbox and Shared Inbox History is not enabled on the Phone number, the user will see an empty message pane for any historic conversation associated with the Shared Inbox. If the user is later added back to the Shared Inbox and Shared Inbox History is enabled on the Phone number, the user will have historical access to all conversations associated with the Shared Inbox.
To remove a user from a Shared Inbox:
- Select the shared Inbox you’d like to modify
- Select the user Dropdown
- Scroll to the user or search for the user you would like to remove
- Uncheck the box next to the user’s name
- Scroll to the bottom of the screen and select Submit
- The user will be removed from the Shared Inbox, the SMS conversations associated with the Shared Inbox are removed from the user’s Cytracom account.
Disabling a Shared Inbox
Shared Inboxes can be disabled by Administrators or resellers from within the PBX portal. For accounting purposes, when a Shared Inbox is disabled, it is not removed from billing. The customer will still have the Shared Inbox allocated to enable on a new number or re-enable on the number. If the customer would like to remove a Shared Inbox or all shared inboxes from their billing, they will need to reach out to account management.
To disable a Shared Inbox:
- Select the shared Inbox you’d like to modify
- Disable the Make Shared Inbox switch
- Scroll to the bottom of the page and select Submit
- The Phone Number will be listed under the company tab in it’s previous state. (ie; extension, auto-attendant, etc)